Not every wood needs to be stained, while some needs it for protection against UV rays, precisely what any wood lover or furniture owner with wood would do.
Each time you stain your wood, whether it is being stained to mahogany, walnut, etc., you do it with lots of benefits because it keeps your wood safe and protected while also looking beautiful and unique.
The benefits of staining maple make people find out ways of staining maple to look like walnut, and this article will answer every question you have on that question.
Tools needed for staining
These are the tools you need for staining your wood:
- Walnut Color Stain
- Wood sealer
- Clear finish
- Paintbrush
- Rags
- 220 grit sandpaper
It is impossible to do without these tools, so buy them before you start staining maple to look like walnut.
Preparing Your Maple Wood for Staining
Staining maple to look like walnut is what most people want, but achieving that is always difficult; methods are used to facilitate that.
First, use a wood filler and file your nail holes with them. With this, your wood is sanded correctly.
The second step is cleaning the surface of your wood with utmost care and removing sawdust. Take your time to do this for optimal results. After you are through, the stain should be stirred appropriately to mix well.
Some people go as far as conditioning the stain to obtain a smooth texture and get the desired result while staining.
After this, the maple wood should be sanded appropriately to prepare it for staining. When you are done staining the wood, you will see scratches, blotches, and other things on the wood, which must be entirely removed by properly sanding it again.
Experts have recommended people use 220 grit sandpaper when preparing the maple wood for staining.
The Maple Wood Should Be Sealed.
This is the first and most important step when starting. A sealer has to be applied before you begin staining. This is why buying a wood sealer was important.
With your 220 grit sandpaper, proceed to sand your wood until you achieve a smooth texture. After you accomplish that, severally use a cloth available to remove sawdust. When you are done, evenly rub on the surface of your wood the wood sealer you have.
Doing this is advantageous because it makes filling the wood easy, no matter its porous structure.
During the sealing process, allow it to dry properly for some hours. It should be kept for hours.
Apply Dark Walnut Stain to The Maple Wood
Maple wood has a structure that is tight-grained. Many people have confirmed this. It makes the absorption of stain evenly hard, and it causes blotches.
Using a wood sealer makes it easy to limit the penetration of stain that would otherwise occur, which usually leads to the stain on maple wood and uneven absorbance.
Aim for three coatings to get the color you desire on your wood. Your wood sealer and the wood stain you will use for this process should come from the same company. This will ensure you don’t experience blotches after following all these stains.
Being advised to use products from the same company is because many people have complained that they experience more blotches if their product isn’t from the same producer.
Let It Dry
When you are done staining maple to look like walnut, keep it dry for some time, especially overnight. This will ensure that you see flaws the next day and know the areas that need reapplication of the stain for an even look.
Carefully look out for and notice these uneven patches because most people miss out on them because they assume everything is even after they dried their maple wood to turn to walnut.
You can use Mineral spirits when you are done drying and sealing. Here, you should be able to see your walnut color.
Get a Darker Shade
You may be wondering how to change your wood color to a darker shade because you are not too pleased with the color you have gotten from the staining, especially if it is a Maple color.
We have varying wood colors available, and you can stain it depending on your choice.
You must follow the steps listed below if you want to change your wood color to the color of your choice. What you should do are:
Use dye to tone your topcoats because it will give you that dark maple color you want. Don’t apply too much stain to it, so you don’t lose the clarity of your grain.
The bad thing about using dye is how susceptible your wood will be to flaws, which people try to avoid. So, look out for spots, then reapply your stain when needed.
To quickly get the darker shade of maple color you want, apply dark walnut gel stain to your wood. Most beginners or people with not much experience go for this.
You should use varying degrees of grit sandpaper, but 200 is recommended if you want a smooth surface.
The blotches visible are minimal when you use a walnut gel stain. This is based on the fact that you can not penetrate some parts of the wood. But, be sure to apply the gel evenly while staining.
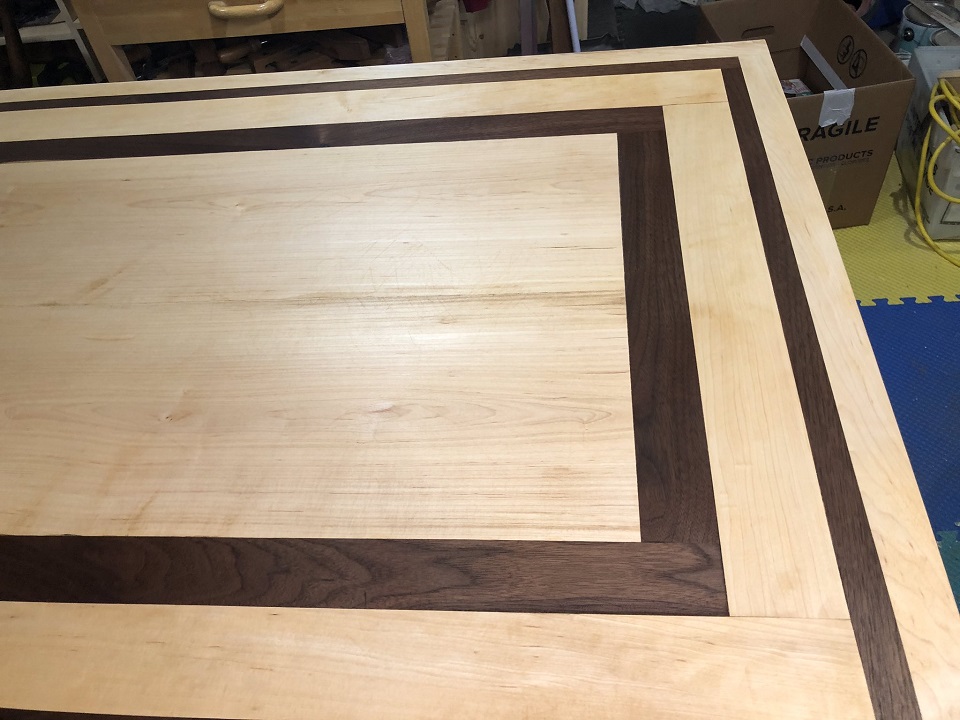
Instead of staining maple to look like walnut, you can glue your walnut up with contrasting woods.
Final Thoughts
Staining maple to look like walnut is easy, irrespective of whether you are a beginner interested in woodwork. When you do it on your own, you earn up saving money.
However, maintaining the normal maple color on your wood may seem better than staining it to a walnut color. But, you should go for what you want.

My name is Mark, and I am a software engineer and the founder of OnWoodWorkingArt.
I grew up with a passion for woodworking and now have my woodworking studio with a group of like-minded friends who love to create woodworking. My dream is to have a more extensive workshop and be able to make woodworking my main business.